Blogspot offer an official Contact Form widget that we can set up easily just by adding it in our blogger layout like any other regular widgets. But the problem is the Contact Form will be displayed in all blog posts and pages which is look very uncommon and unprofessional.
In this article we are going to set up Blogspot Contact Form widget on a separate single page.
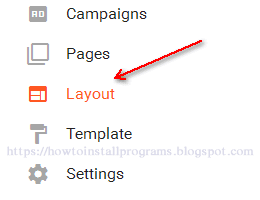
Login to your Blogspot, in the Admin page click on "Layout"

Click on "Add a Gadget"

From the menu selection, click on "More Gadgets" and then click on the plus sign to add the Contact Form to your blog.

No need to fill anything because we are going to delete it anyway, click the "Save" button

In the Admin page click "Template" and then "Edit HTML"

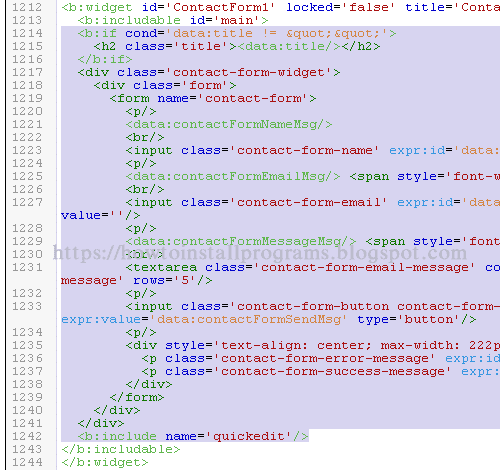
Find and expand this tag:
<b:widget id='ContactForm1' locked='false' title='Contact Form' type='ContactForm' visible='true'>...</b:widget>Delete all codes in between tag <b:includable id='main'> and </b:includable>

Here is what it will look like after you delete the codes
<b:widget id='ContactForm1' locked='false' title='Contact Form' type='ContactForm' visible='true'>
<b:includable id='main'>
</b:includable>
</b:widget>
Now heads up to the top of the HTML code page, find and expand this tag:
<b:skin>...</b:skin>Here are the Contact Form CSS, you can edit them to match your blog template.
#contact-form{margin-bottom:20px;}
.contact-form-name,.contact-form-email,.contact-form-email-message {max-width:240px;margin:12px 0;padding-left:10px;}
.contact-form-email-message{padding:10px;max-width:100%;}
.contact-form-button-submit{margin-bottom:12px;cursor:pointer;border:1px soild #000;font-weight:bold;color:#fff;background:#3F3F3F;}
.contact-form-button-submit:hover{background:#000;}
Copy and paste them before the closing tag ]]></b:skin>

Save the Template
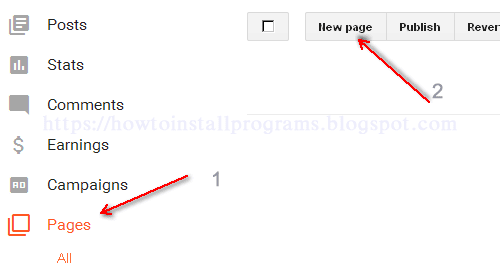
Back in the Admin page click on "Pages" and then "New Page"
Blogger does not allow us to change the page permalinks, so if you want to set your contact form permalink as "contact.html" follow the instructions below:
Copy this text "Contact" without quotation marks and paste it as soon as possible in the page title after you click on the New Page.

After you've created a new page copy and paste this Contact Form HTML code:
<form name="contact-form">
 <p>Your Name</p>
 <p><input class="contact-form-name" id="ContactForm1_contact-form-name" name="name" size="30" type="text"></p>
 <p>Your Email (required)</p>
 <p><input class="contact-form-email" id="ContactForm1_contact-form-email" name="email" size="30" type="text"></p>
 <p>Your Message (required)</p>
 <p><textarea class="contact-form-email-message" cols="25" id="ContactForm1_contact-form-email-message" name="email-message" rows="6"></textarea></p>
 <p><input class="contact-form-button contact-form-button-submit" id="ContactForm1_contact-form-submit" value="Send Message" type="button"></p>
 <div style="width: 100%">
  <p class="contact-form-error-message" id="ContactForm1_contact-form-error-message"></p>
  <p class="contact-form-success-message" id="ContactForm1_contact-form-success-message"></p>
 </div>
</form>
</div>
You can add your own words on the top as you see in this example

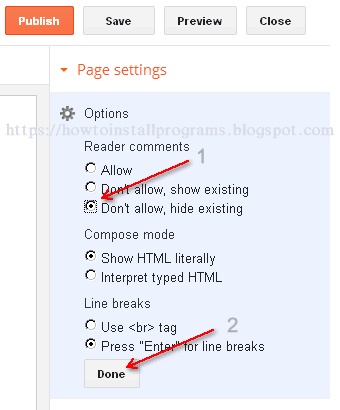
Before you Publish your Contact Form page, go to the page options and disable reader comments

If you want to remove page footer from your Contact Form page, add this code in the bottom of the Contact Form HTML code
<style type="text/css">.post-footer {display: none;}</style>
Here is a Contact Form live preview on this blog
https://howtoinstallprograms.blogspot.com/p/contact.html
No comments:
Post a Comment